Description
This guide explains the steps required to migrate the databases from “localhost” to an external database server.
Requirements
- Have TEOS Manage installed and have administrator access to the TEOS server
- Have SQL Server Management Studio (SSMS) installed
- Have sysadmin access to the database instance which stores the TEOS databases
- Have sysadmin access to the second database instance where the TEOS databases need to be stored
How to migrate the TEOS databases
- To prevent any changes being made to the databases during the migration process, we advise stopping the service called “World Wide Web Publishing Service”. Once this service has stopped, IIS will no longer be active, and TEOS will be offline.
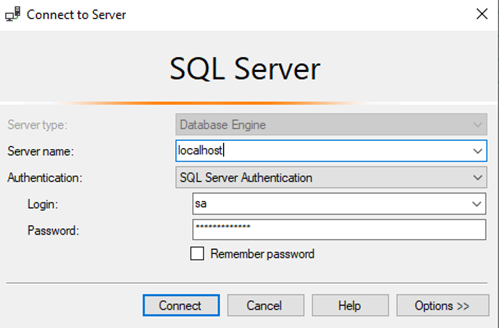
- Now we need to log in to the database instance currently used by TEOS. We can log in using SSMS.
- We need to create backup files for the TEOS databases. A backup is required for the following databases:
- 0000
- TDM Master
- CustomerDB
- Google Calendar Logins
- Sony Sales App (removed from 3.3.0 and above)
- SonyManagementPortal-Analytics
- SonyManagementPortal-Iot (version 2.2 and above)
- SonyManagementPortal
- Yammer Logins (removed from 3.3.0 and above)
- TDM-Master (version 3.3.0 and above)
- TDM-teos (version 3.3.0 and above)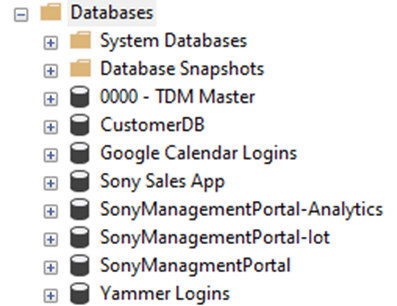
- A backup can be created by right-clicking a database, navigating to “Tasks,” and selecting “Back up.”

- Once selected, a window will open where you can configure the backup. In this window, please configure the destination for the backup file. By default, this is:
\ \MSSQL\Backup
Please note that the filename should end with .bak, which is the file extension for MSSQL database backups. For example: tdm-master.bak
Once everything has been set, select “OK” to create the backup.
- Please repeat the previous steps for all TEOS databases. Once all backups have been created, you can continue with the next step.
- Once the backups are ready, navigate to the backup folder, copy the files, and move them to the remote SQL server. We advise copying them into the same directory on the remote SQL server so that MSSQL can easily locate and use the files.
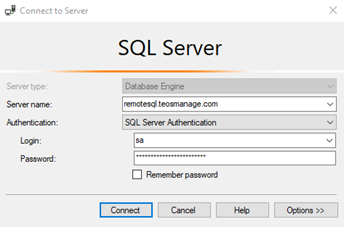
The backup file path is: \ \MSSQL\Backup - Once the files have been copied, a second connection can be established in SSMS — this time to the remote SQL server. This can be done using the following option:

- A login screen will appear where you can enter the credentials for the remote SQL server.
- Once connected to the remote SQL server, you can restore a database by right-clicking “Databases” and selecting “Restore Database”.
- In the window that opens, configure the following fields:
- Device: This is where you link the backup file. Please link it to the .bak backup file.
Once you have linked the .bak file, the database information will automatically be loaded. Select “OK” to restore the database on the remote SQL server. - Repeat the previous steps until all TEOS databases have been restored on the remote SQL server.
- Once the databases are restored, we need to create the SQL users and link them to the correct databases. To do this, please make sure you have opened the connection to the local database instance. Once this has been opened, navigate to: Security > Logins

- In this overview, you will find all the users available in the SQL instance. The following users are used by TEOS:
- analyticsuser
- customeraccount
- googlecalendar
- iotuser
- isenuc
- managementuser
- sonysalesapp
- yammerlogin - Once you double-click a user, the properties of that user will be shown. It is very important to use the exact same username, together with the permissions configured in the tab called “User Mapping.” The passwords for the users cannot be found in this overview. They are available on the TEOS web server in the web application called “backbone.” The passwords can be found in the following file: \TEOS Manage\www\backbone\web.config
This file can be opened with a text editor, for example, “Notepad.” Once opened, you will find a “ConnectionString” section that contains the password for the SQL users.
In the example below, the password can be found in bold text: - Now that we have all the information for the SQL users, we can start creating the users on the remote SQL server. Users can be created by right-clicking “Logins” and selecting “New Login.”

- Please create the following users on the remote SQL server with the password from the web.config file, and set the permissions configured in the “User Mapping” tab.
- analyticsuser
- customeraccount
- googlecalendar
- iotuser
- isenuc
- managementuser
- sonysalesapp
- yammerlogin - Now that we have recreated all the SQL users, we need to adjust the connection strings in the database “0000 - TDM Master.” The connection strings are located in the following tables:
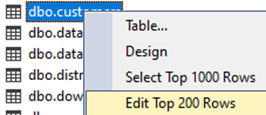
- dbo.customers
- dbo.sql_servers - To change these, we need to open the tables using SSMS. This can be done as follows:
- The values for “connectionstring” and “stats_connectionstring” contain connection strings that need to be replaced with the updated ones.


Important: Please make a backup of the current value before adding the updated connection string.
Please find below an example of a connection string that can be used:
server= ;Database=customerdb;User Id=customeraccount;Password= ;
The example connection string can be copied and adjusted. Once adjusted, it can be pasted into the “connectionstring” and “stats_connectionstring” values. - Once “dbo.customers” has been adjusted, we need to open the table “dbo.sql_servers” using the same method. In this table, there is another “connectionstring” value that uses a different format. Please adjust the bold part of the connection string so it contains the remote SQL server.
server= ;Database=0000 - TDM Master; User Id=isenuc;Password=xxxxxxx; - Once all SQL changes have been completed, we need to adjust the connection string information for all the web applications. To do this, please log in to the TEOS web server and open the root of the TEOS Manage installation directory. This is the following file path:
\TEOS Manage\www\
- In this folder, you will find all the directories for the web applications used by TEOS. Each web application has its own web.config file. The web.config file contains all the information regarding the database connections, which means we need to adjust all of them to ensure they use the remote SQL server for their connections.
The following files need to be adjusted:
\TEOS Manage\www\4.1\Designer\web.config
\TEOS Manage\www\4.1\html5player\web.config
\TEOS Manage\www\4.1\PresentationService\web.config
\TEOS Manage\www\backbone\web.config
\TEOS Manage\www\backbone\employeeapp\web.config
\TEOS Manage\www\dataservice\web.config
\TEOS Manage\www\EventsWebService\web.config
\TEOS Manage\www\fileprocessor\web.config
\TEOS Manage\www\FileSyncWebService\web.config
\TEOS Manage\www\googlecalendar\web.config
\TEOS Manage\www\html5player\web.config
\TEOS Manage\www\htmlplayerRoot_app\web.config
\TEOS Manage\www\LicenseWebService\web.config
\TEOS Manage\www\logging\web.config
\TEOS Manage\www\meetingroom\web.config
\TEOS Manage\www\office365\web.config
\TEOS Manage\www\powerservice\web.config
\TEOS Manage\www\PresentationService\web.config
\TEOS Manage\www\ProofOfPlayService\web.config
\TEOS Manage\www\Sony Sales App\web.config
\TEOS Manage\www\StatsWebService\web.config
\TEOS Manage\www\updateservice\web.config
\TEOS Manage\www\watcherservice\web.config
\TEOS Manage\www\WebserviceRoot\web.config
\TEOS Manage\www\tdm5\appsettings.json
These files contain connection strings that currently point to the local SQL server. They need to be adjusted so that the connection strings point to the remote SQL environment. We need to modify the “Data Source=” or ‘Server=’ value, which is currently set to “localhost”. This should be changed to the remote SQL server. In our example, this is remotesql.teosmanage.com.
Example connection string after adjustment:
"Data Source=remotesql.teosmanage.com;Initial Catalog=SonyManagmentPortal;
User Id=managementuser;Password=xxxxxxxxxxxxx;" providerName="System.Data.SqlClient" />
Once all the web.config files have been adjusted, you can continue with the next step.
Once this step has been completed, the TEOS databases have been successfully migrated. The last thing left to do is to start the “World Wide Web Publishing Service” on the TEOS web server. Once started, please verify that TEOS is online again and log in to the web interface. Confirm that the preview function is working. The preview function can be found here:
Workplace Solutions > Signage > Play button in front of a presentation
If this displays the presentation, the migration has been successfully executed. If not, please verify that the users were created with the correct passwords and permissions.
If you cannot identify the cause of the issue, please feel free to contact us — we’ll be glad to assist.