Description
This guide explains how to uninstall TEOS Manage. This can be used when you want to perform a fresh installation of TEOS Manage on the same server.
Requirements
- An active TEOS Manage installation
- Administrator rights on the web server
- Sysadmin rights on the SQL Server
How to uninstall TEOS
- The uninstallation of TEOS Manage requires several actions:
a. Remove IIS Sites
b. Remove IIS Application Pools
c. Remove Databases
d. Remove Database Users
e. Remove Files
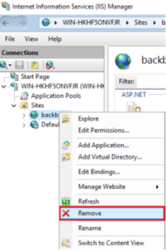
f. Remove Registry Items - To remove the IIS Sites, open IIS and expand the “Sites” tree. Right-click on ‘Backbone’ and select “Remove”.
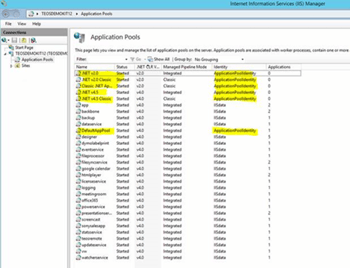
- Next, click on the “Application Pools” menu. Right-click each application pool (except the yellow-highlighted ones shown in the screenshot below) and select “Remove”.
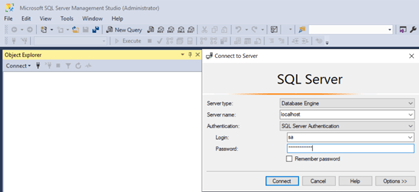
- Next, open SQL Server Management Studio (SSMS), connect to the server with sysadmin credentials, and expand the “Databases” tree.
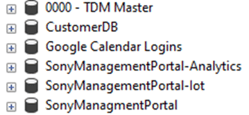
- Right-click the following databases and select “Delete”. From version 3.3.0 and above, these two databases are also present:
- Once the databases have been deleted, open Security > Users and delete the following users:
- managementuser
- isenuc
- customeraccount
- sonysalesapp
- analyticsuser
- googlecalendar
- yammerlogin
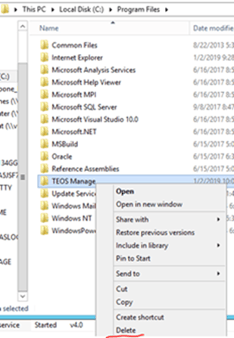
- Next, navigate to the folder where TEOS Manage is installed. By default, this is: “C:\Program Files”. In here, remove the entire TEOS Manage folder.
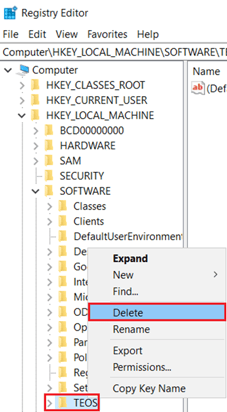
- For the last step, remove the registry entries. To do this, open the Registry Editor and go to the path: “Computer\HKEY_LOCAL_MACHINE\SOFTWARE”. In here, delete the key “TEOS”.
TEOS Manage is now fully uninstalled.