Description
Thank you for purchasing Manage for TEOS. This document provides information about third-party devices compatible with TEOS and explains the configuration and installation process possible with them.
Table of Contents
Description
1. Third-party devices reference table
2. Control capabilities from TEOS
2.1. Add a third-party device to TEOS On-Premise
2.2. Add a third-party device to TEOS Cloud
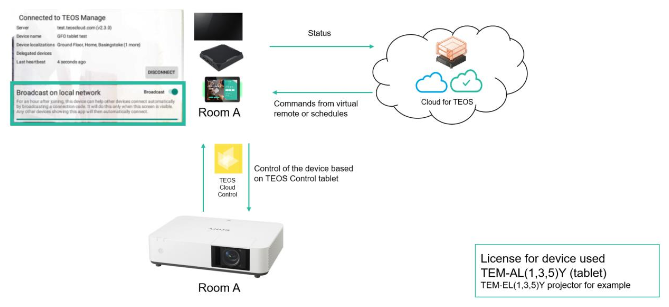
2.3. Control commands integrated into TEOS
3. Network configuration for control
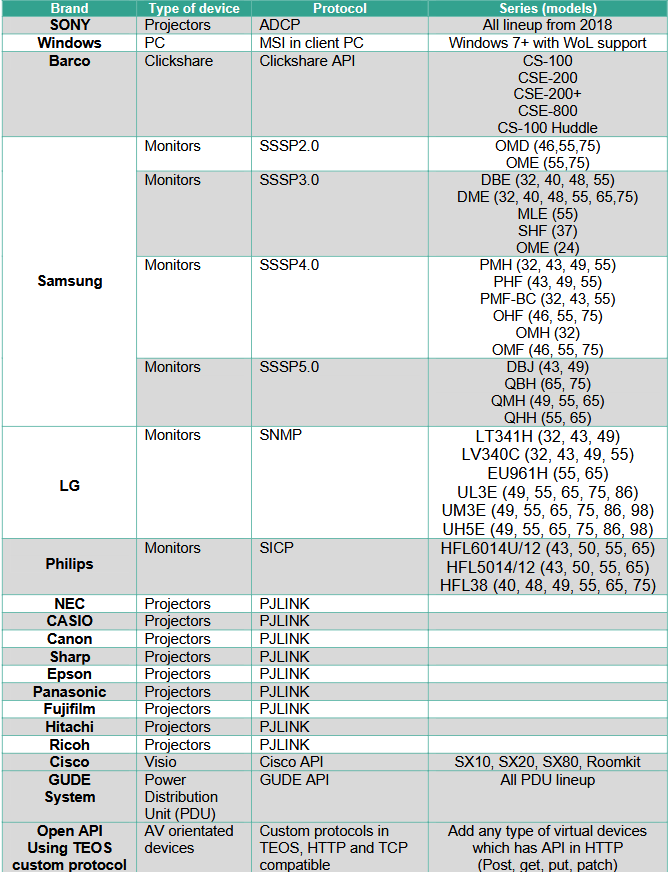
3.1. Manage for TEOS & projectors
3.2. Manage for TEOS & third-party monitors
3.3. Manage for TEOS & third-party devices
4. Devices configuration
4.1. Windows 7+ machine
4.2. Barco ClickShare
4.3. Samsung monitor
4.4. LG monitor
4.5. Philips monitor
4.6. PJLink devices
4.7. Cisco video conferencing devices
4.8. TEOS Custom Protocol
5. Add an HTML device in TEOS
6. Add devices to Manage for TEOS
6.1. Add a device in Manage for TEOS
6.2. Control the device in Manage for TEOS
6.3. Link display device with the Player device in TEOS
6.4. Schedule actions to the device in Manage for TEOS
1. Third-party devices reference table
2. Control capabilities from TEOS
Manage for TEOS can integrate third-party devices for control purposes only. This means that the only compatible license with these devices is the Control License (TEM-CO10). To display signage content on a third-party device controlled by Manage for TEOS, a Player license is required.
2.1. Add a third-party device to TEOS On-Premise
- Verify that the third-party device is compatible with TEOS.
- Follow the networking instructions (open ports, etc.).
- Purchase the Control License for the device (TEM-CO10/TEM-ELxY). To display signage, purchase a Signage License (TEM-DS10/TEM-ALxY) and an Android Player for TEOS.
- Add the device in TEOS. For signage usage, link the device with a Player.
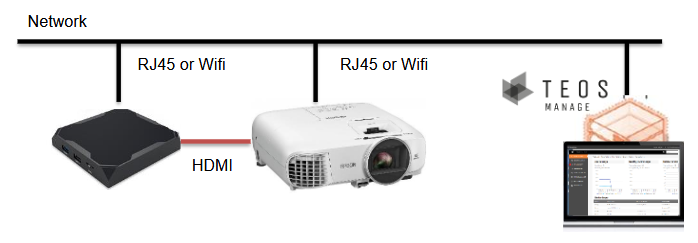
2.2. Add a third-party device to TEOS Cloud
- Verify that the third-party device is compatible with TEOS.
- Follow the networking instructions (open ports, etc.).
- Purchase the Control License for the device (TEM-ELxY). To display signage, purchase a Signage License (TEM-ALxY) and an Android Player for TEOS.
- To control the third-party device, install the TEOS Cloud Control app on a device within the same network. This device will broadcast commands from the cloud to the local network.
2.3. Control commands integrated into TEOS
3. Network configuration for control
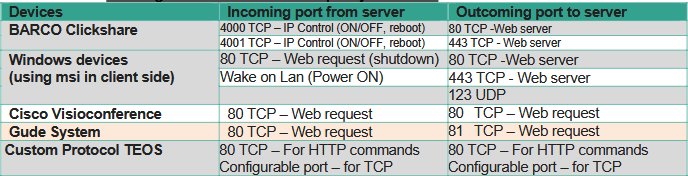
Manage for TEOS follows the network protocols of the integrated third-party devices, which use specific ports.
3.1. Manage for TEOS & projectors

3.2. Manage for TEOS & third-party monitors
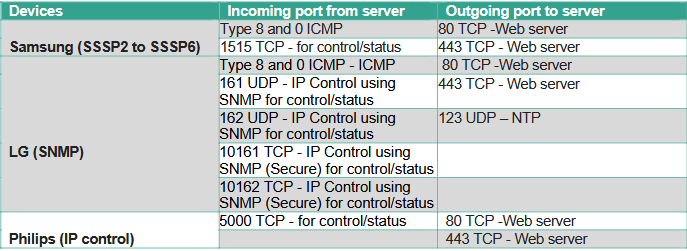
3.3. Manage for TEOS & third-party devices
4. Devices configuration
This section explains the required configuration for each third-party device.
4.1. Windows 7+ machine
The procedure to control Vision Exchange and Windows 7 or newer versions is the same. Install the Control for TEOS for Windows setup, which allows the device to receive HTTP commands from TEOS and send Windows commands to shut down the device.
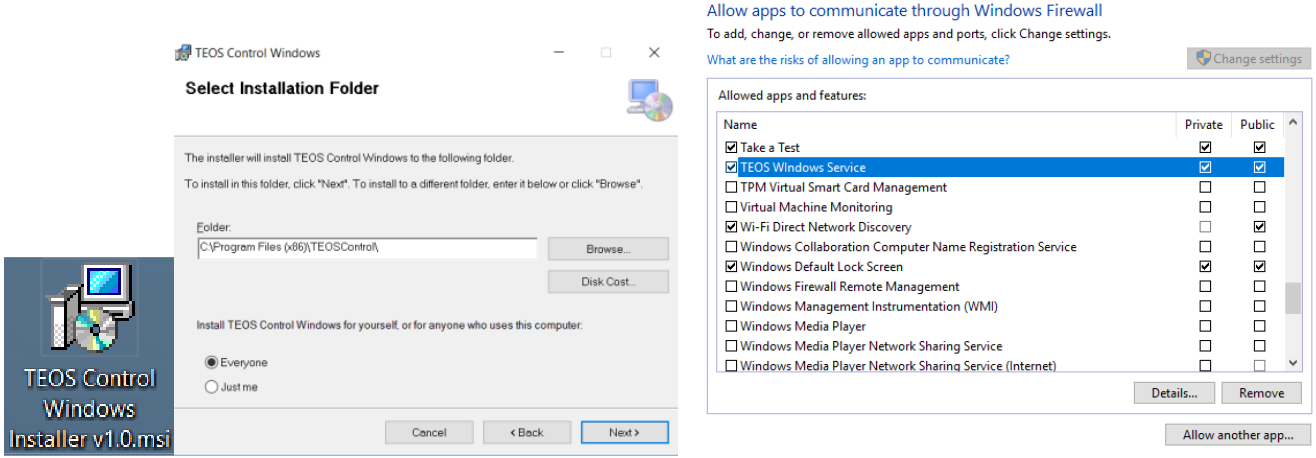
Ensure that the tool is allowed on your Windows machine and not blocked by the firewall.
To power ON, the method used is Wake-on-LAN. Go to your network card configuration and enable “Magic Packet” and “Wake-on-LAN”.

4.2. Barco ClickShare
The API can be enabled or disabled, allowing or blocking access to the unit from external devices. It is not enabled by default.
How to enable:
- Log in to the Configurator.
- Click “WiFi & Network → Services”.
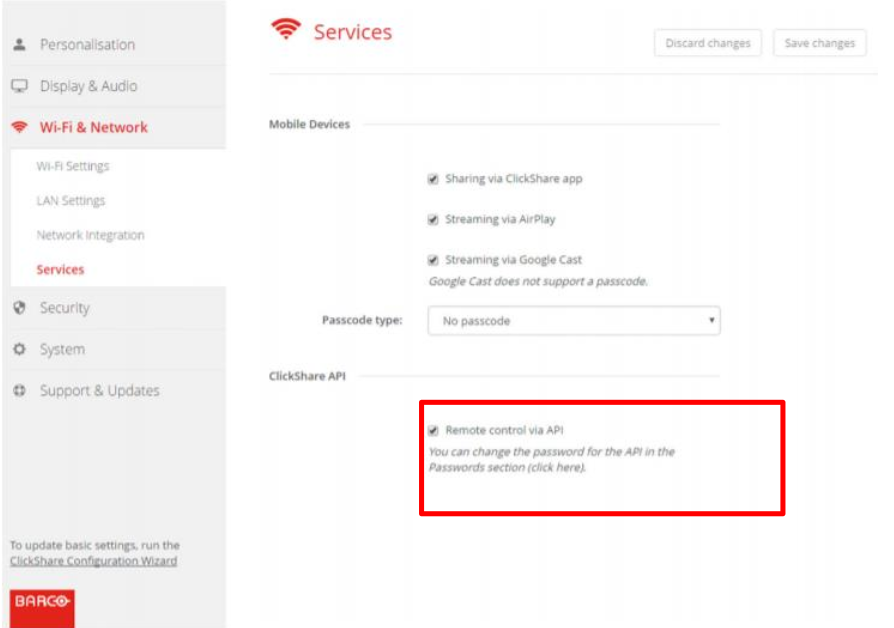
Check the box in front of “Remote control via API” to enable this function.
Password management is not included in TEOS.
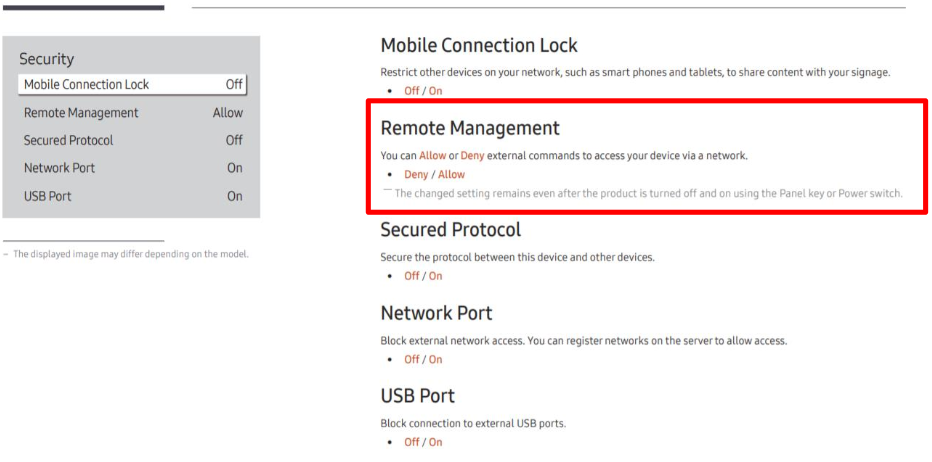
4.3. Samsung monitor
Follow the instructions on your specific device. Below is an example of configuration for DBJ/QBH device types.
How to enable:
- Go to “Settings”.
- Select “Remote Management”.
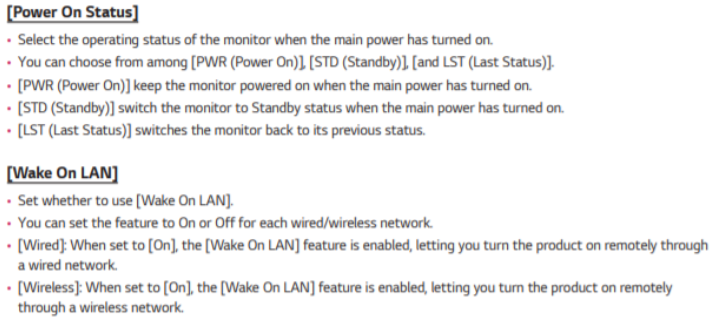
4.4. LG monitor
The LG platform includes support tools for managing systems, such as Simple Network Management Protocol (SNMP), which enables monitoring of TVs on the network for maintenance and administration. The Wake-on-LAN feature allows communication while powered off, enabling remote software updates.
Configure the network parameters and allow control in your LG device.
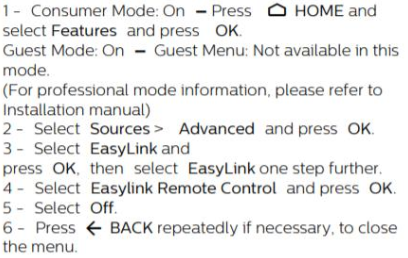
4.5. Philips monitor
Follow the instructions on your specific device. Example:
Use EasyLink Remote Control if you want devices to communicate but do not wish to operate them using the TV remote. You can switch EasyLink Remote Control on or off as needed.
4.6. PJLink devices
Follow the instructions on your specific device. Example configuration using an Epson device:
- Go to MENU and select “Network Configuration”, then press Enter.
- Select the “Basic” menu and press Enter.
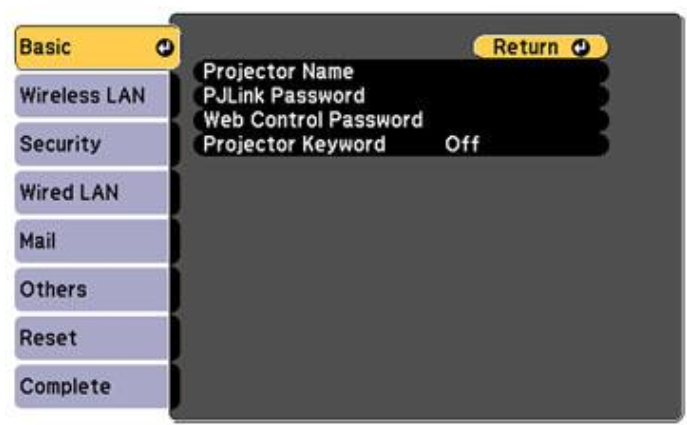
Select the following basic options as necessary:
- Projector Name: Enter a name (up to 16 alphanumeric characters) to identify the projector over the network.
- PJLink Password: Enter a password (up to 32 alphanumeric characters) to use the PJLink protocol for projector control.
4.7. Cisco video conferencing devices
Follow the instructions on your specific device. Below is an example configuration using an Epson device:
Go to MENU and select “Network Configuration”, then press Enter.
4.8. Gude System Power Distribution Unit
Since version 3.2 of TEOS, a new device type has been introduced — the PDU (Power Distribution Unit). It provides real-time power consumption data (in watts and voltage) and allows you to configure plug activity.
To set this up, create a new device under Administration > AV Device > Add new device and select the type “PDU”.
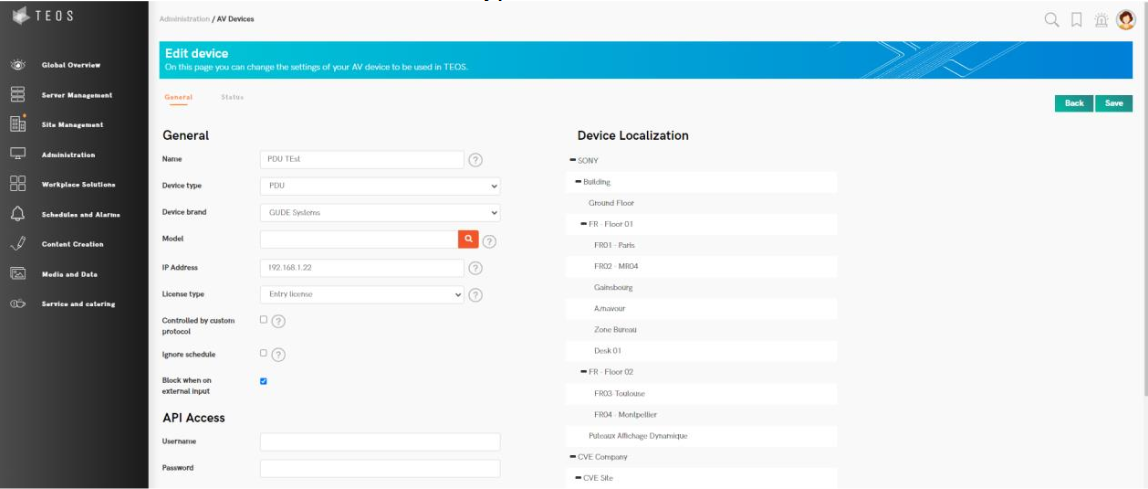
The Gude System brand requires API access with a username and password. Once configured and with an Entry license, you can retrieve data and control power outputs.
Save the configuration, then go back to the device. Under “Status”, you can control the device manually.

The device can also be included in a power schedule, allowing automation scenarios to power plugs on or off based on different conditions.
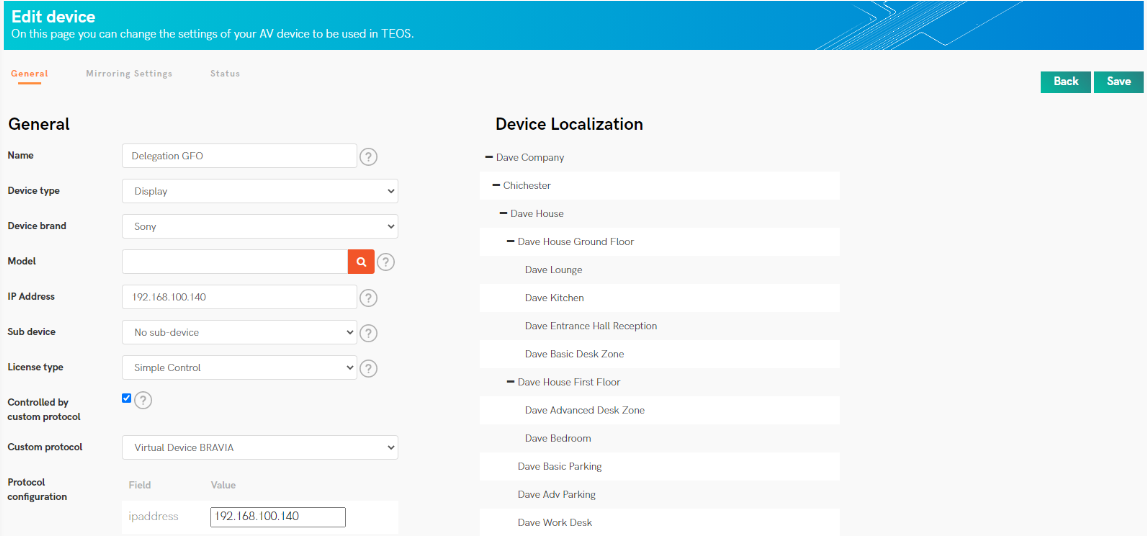
4.9. TEOS Custom Protocol
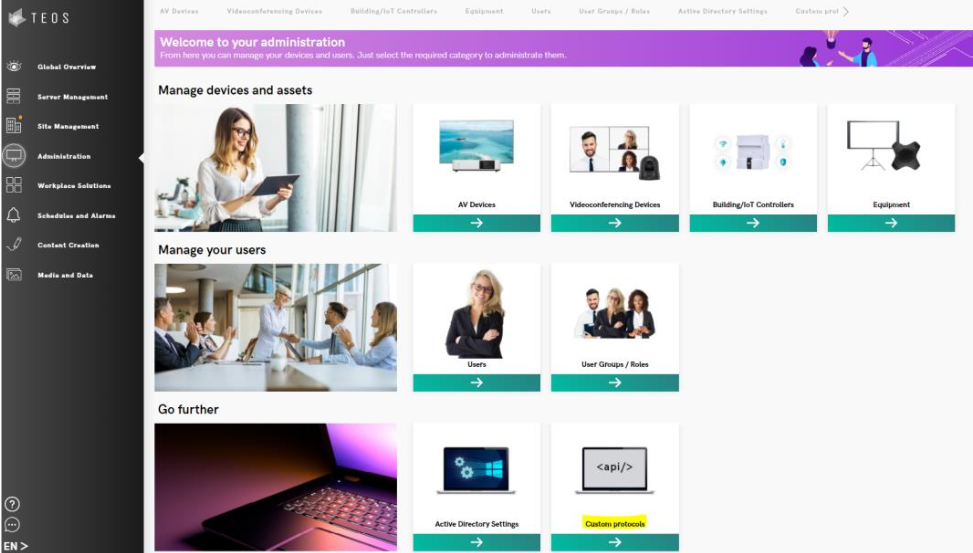
From version 3.0 onwards, you can add custom protocols to use devices not natively integrated into TEOS. Go to Administration > Custom Protocols in TEOS.
Under “Custom Protocols”, you can add a custom protocol to represent a virtual device (the target in this document) or a custom command. When creating a virtual device, all available actions (set and get commands) are listed on the right side.
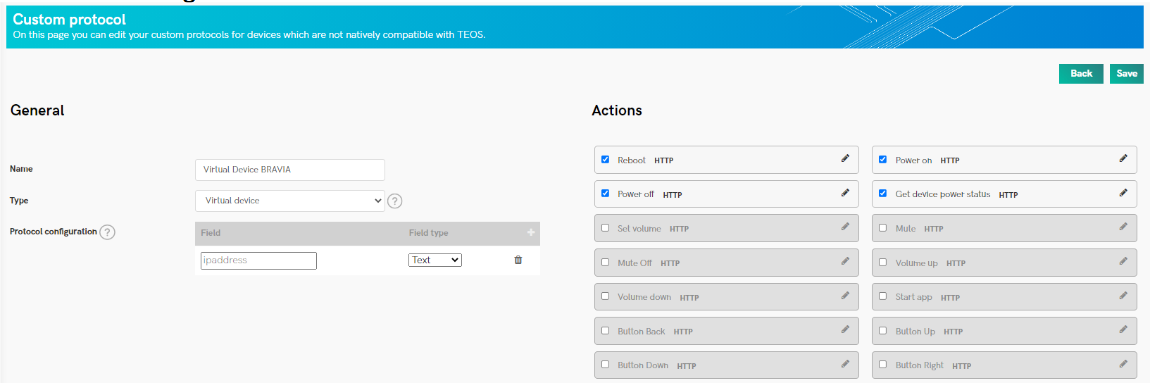
Example configuration: using the Sony BRAVIA web API.
Create a text field named “ipaddress” for the device’s IP address.

Example Power ON button configuration using Sony BRAVIA web API:
Protocol: HTTP
URL: http://[ipaddress]/sony/system
Request Method: POST
Content-Type: application/json
Body:
{
"method": "setPowerStatus",
"id": 55,
"params": [{"status": true}],
"version": "1.0"
}

Repeat the process for other commands, then save the full custom protocol.
Next, create the device under Administration > AV Devices. Add the device name and IP address, and select “Simple Control” as the license. Enable the “Controlled by Custom Protocol” option and choose the protocol you created. Press “Save”.
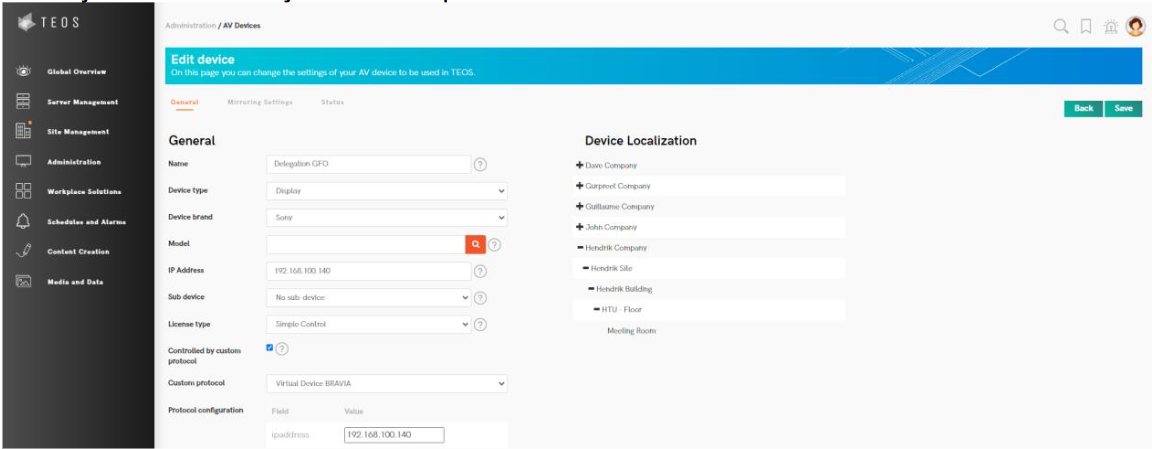
The device will now function like any other integrated device, using its API for control.
5. Add an HTML device in TEOS
This option allows sending content to third-party devices (such as Barco ClickShare, Poly X series, or any device that supports HTML5).
Go to Administration > AV Devices and add a new device.
Select the device type: “HTML Player”.
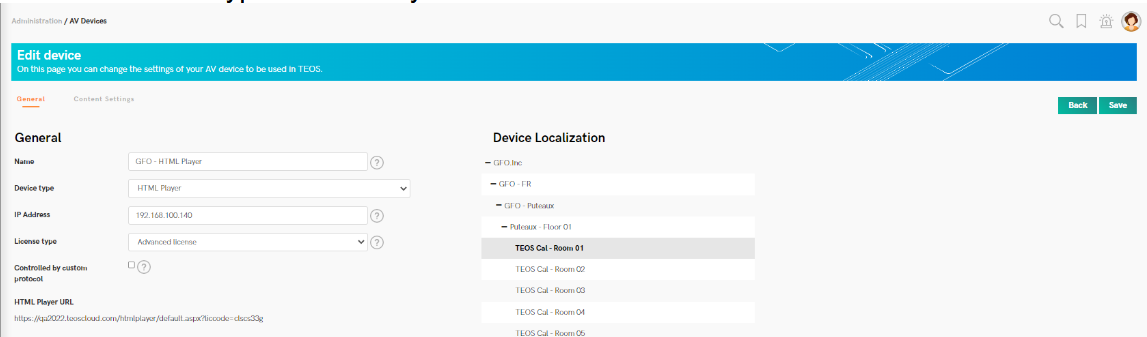
Define the IP address and add an Advanced license to the device.
A unique URL will be created to add to the third-party device.
Any content or assignment (via default presentation or content schedule) can now be sent.
6. Add devices to Manage for TEOS
Manage for TEOS includes a “Supervision” module to monitor device status and allows manual or scheduled control. Below is the procedure to configure this workflow:
6.1. Add a device in Manage for TEOS
- On the TEOS web interface, go to Administration > Device Management.
- There are three ways to add devices to TEOS: import via Excel, device auto-discovery, or manual addition (explained below).
- Press “Add Device” and fill in the following:
- Enter the device name.
- Select “Display” as the device type.
- Select “Sony” as the device brand.
- The model will be automatically filled.
- Enter the IP address of the device.
- Enter the MAC address (for Wake-on-LAN).
- Select “Simple Control” as the license type (minimum required license: TEM-CO10).
- Add the device to a device group (created beforehand in Site Configuration).
- Press “Save”.
Note: If you do not have an activated license for the device or have run out of licenses, a message will appear at the top of this tab.
6.2. Control the device in Manage for TEOS
If the device is not connected to the network, IP control is off, or ADB is not activated, you will not be able to control the device or see its Android interface.

In “Site Management” → “Site Overview”, you can view your group hierarchy, check the device status, power devices on/off, and access the virtual remote from this overview.
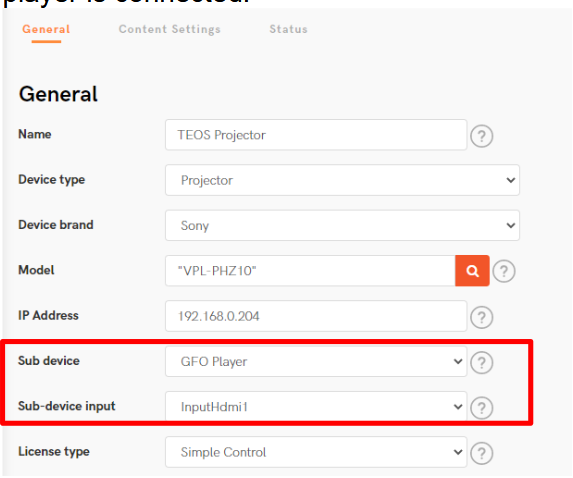
6.3. Link display device with the Player device in TEOS
This option simplifies workflows when using a third-party device with digital signage. Linking the third-party device and Player ensures synchronized scheduling rules for both devices during power ON/OFF or content scheduling.
On the TEOS web interface, go to Administration > Device Management, and edit your device. Select the Player you want to link it with, then choose the input where the player is connected.
6.4. Schedule actions to the device in Manage for TEOS
From Manage for TEOS, you can schedule your commands to have automatic control of your
devices. To do this, go to Schedules & Alarms and then to Action Schedules.
You will be able to control power, reboot, update apps, start signage, start meetings, mute,
manage volume, channels, etc. These scheduled commands can be addressed to a device or a
group of devices.